Note: 3D effects are not working in Ruffle.
Enter Fullscreen
Controls
Walkthrough
Point and Click
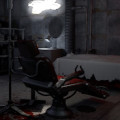
In Cube Escape: Case 23 you need to investigate the mysterious death of a woman. Collect all the evidence and discover the gateway to Rusty Lake. Click on the arrows to navigate inside the cube. Interact with objects by clicking. Select found items in your inventory and click somewhere on screen to use them.
Chapter 1/4: The Murder SceneIt was the strangest scene I had ever seen in my long career as a homicide detective. The first time I stepped into that room, I knew there was something more than just a dead body.

Fall 1971

The Murder Scene

Victim

Focus on Laura.

Unzip her dress and receive the paper.

Click her hair twice.

Click on her mouth until the bug is let out and scurries away.

Click the bug until it leaves the screen.

Defocus.

Click the doorway.

Go right twice.

Couch/Phone

Lift the right: hand cushions to receive the paper.

Click the bug until it leaves the screen.

Focus on the parrot picture.

Tear off the part that reads "Psittacus" to receive "psittacus" on paper.

Defocus, then go right.

Bookshelf/Desk

Focus on the cactus.

Click the plant label to receive "cactus" on label.

Defocus, then focus on the photo.

Click on the nameplate to receive "arles" on label.

Defocus, then focus on the doll.

Expand each doll out, including the last one. You will be swapping objects:Drag the rose to the first doll, then close and reopen.

Drag the fish bones to the fourth doll, then close and reopen.

Drag the blood drop to the third doll, then close and reopen.

Drag the egg to the second doll, then close and reopen.

Receive the key, then defocus.

Use the key on the right: hand cabinet door and receive a jar of flies.

Focus on the fishbowl.

Drop a fly in the fishbowl.

Use the shrimp or algae to move it to the shell.

When the finger pushes it out, use the algae to move it to the fish's mouth.

Get the key, then defocus.

Focus on the desk.

Use the key on the desk and get the folder.

Click on the folder in your inventory.

Click the artist's name to receive "lacus fleo" on label.

Defocus out, then go left.

Couch/Phone

Focus on the table with the phone.

Get the cigar.

Focus on the crossword puzzle.

Put the labels in the correct boxes.

Tear out the boxed word to get "fate" on paper.

Defocus, then go right.

Bookshelf/Desk

Focus on the books.

Lift all 16 books.

Each next book you pick up must contain a symbol or color that the previous one did.

One solution of many, left to right: 15: 7: 16: 1: 4: 10: 2: 8: 3: 5: 14: 13: 11: 12: 6: 9.

Click the shelf with the up arrow, then pull down the panel.

Defocus, then look at the ceiling.

Ceiling

Click the bug through every room, including the ceiling, until it returns to the bookshelf/desk room.

Bookshelf/Desk

Click the bug until it's hiding behind the desk, then focus on the desk.

Click the iron, then the bug, then drop the iron on the bug.

Lift the iron and get the key.

Defocus, then use the key on the left: hand cabinet door to retrieve another paper.

Go left.

Couch/Phone

Focus on the corkboard.

Put the three papers on the board to fit with the fourth already there.

Click the folder in your inventory.

Open the folder.

Use the cigar to burn the places that the papers advised: cube, hand, the house in the background, and eye.

Symbols, in order: circle with dot, upside: down triangle, empty target, square.

Defocus out, then go right.

Bookshelf/Desk

Focus on the books.

Spin the dials to match the symbols above, and get the number: 024355Defocus, then go left.

Couch/Phone

Focus on the desk, then the phone.

Click the handset.

Dial: 024355

V: Hello?

D: Hello, this is detective Dale VandermeerV: Yes

D: Is this Rusty Lake?

V: Say the word...

D: I don't know the word...

When the voice says to say the word, click on the paper that says "fate".

D: Fate?

V: I am sorry

V: Your place is already takenDefocus, then go right twice.

Victim

Focus on Laura.

Click on Laura's mouth.

Continue clicking her until she disappears.

Look at the ceiling to get: 1421Return to the Bookshelf/Desk room.

Bookshelf/Desk

Focus on the safe.

Enter: 1421

Receive the evidence, then click on it in your inventory.

Open the folder and click.

Chapter 2/4: The InvestigationFor months, I could not think about anything else than the events that happened after I found the dead woman. What is Rusty Lake? I collected all the information I could find and locked myself into my office, trying to learn more about Rusty Lake and this mysterious woman.

Summer, 1972

My Office

Break Room

Focus on the blinds.

Open the right: hand blinds, then defocus.

Open the cabinet door and get the coffee.

Go right.

Filing

Focus on the filing cabinet.

Open each drawer to receive the coffee filter, razor, and map.

Defocus, then go right.

Desk

Focus on the drawers.

Open each drawer to receive the marker, numbers on paper, and a screwdriver.

Defocus, then focus on and take the empty coffee pot.

Put the coffee filter and coffee in the coffee maker.

Defocus and go right.

Sink/Mirror

Pull down the projector screen.

Focus on the mirror.

Use the razor on yourself, get the razor back, then defocus.

Focus on the sink.

Turn on the water until the hair stops moving, then turn off the water.

Click the lump until it turns into a young crow, which you pick up.

Fill the coffee pot with water.

Defocus, then go right.

Break Room

Focus on the machine.

Get the paper.

Defocus and go right.

Filing

Focus on the vent.

Use the screwdriver on the vent.

Give the young crow to the cat.

Click the cat until the crow is swallowed.

Defocus, then focus on the projector.

Get the paper.

Defocus, then go right.

Desk

Focus on the coffee maker.

Put the water in the water holder.

Put the empty coffee pot back in the maker.

Turn the switch on.

Click to receive a coffee pot with coffee.

Defocus, then focus on the desk.

Pour coffee into the cup, then click the cup to drink the coffee: 247Defocus out, then focus on the left corkboard.

Take note of the photo arrangement.

Defocus, then focus on the right corkboard.

Put the two pieces of paper on the board:The old "man" "walked" beside the "lake". As he approached the "mill", the time "stopped". The "numbers" appeared above the lake.

Defocus, then go right twice.

Break Room

Focus on the TV.

Set the numbers to 247.

Click the figure on the screen.

Defocus, then focus on the windows.

Click the windows until you retrieve the black cube.

Defocus, then go right.

Filing

Click on the vent and receive the egg.

Defocus and go right.

Desk

Focus on the typewriter.

Type: MAN

Click the blob on the paper.

Type: WALKED

Type: LAKE

Type: MILL

Type: STOPPED

Type: NUMBERS

Click the blob: 392

Defocus, then go left.

Filing

Focus on the projector.

Put the map on the projector, then turn it on.

Defocus, then go right twice.

Sink/Mirror

Focus on the screen.

Select the red marker:

Draw a line from the mill (left) to the hill (right).

Draw a line from the bridge to the chapel.

Draw a line from the bridge to the cabin (upper right).

Draw a line from the hill to the chapel.

Circle the intersection of hill: chapel and bridge: cabin, and label that A.

Circle the intersection of mill: hill and bridge: chapel, and label that B.

Circle the mill and label that C.

Defocus and return to the projector.

Filing

Focus on the projector.

Replace the map with the numbers on paper.

Defocus, then go right twice.

Sink/Mirror

Focus on the screen.

Get the numbers: 746

Defocus, then go right.

Break Room

Focus on the TV.

Enter the numbers: 746.

Click the screen until Laura's hand emerges.

Give her the egg.

Click the screen until she hands you the white cube.

Click the screen again to turn it off.

Enter the numbers: 392.

Put the white cube in the square on the left.

Put the black cube in the square on the right.

Defocus, then look up.

Turn on the fan.

Chapter 3/4: The Chapel

At last, I was close to Rusty Lake. Although I did not understand what happened, after a deep sleep I found myself on the floor of the mysterious chapel I knew from the pictures.

Summer, 1972

The Chapel

Stained Glass

Focus on the first puzzle.

Rotate the squares until it is fixed.

Focus on the third puzzle.

Rearrange the squares until it is fixed.

Assuming the columns are ABC and the rows are 123, you'll move whatever is in the position below to the blank spot: [1]A1A2A3B3B2B1C1C2B2B1A1A2A3B3C3C2B2B3A3A2A1B1B2A2A3B3B2A2A1B1B2B3A3A2B2B1

As in, you'll click at the B3 position in the grid to move whatever piece is there into the blank spot.

Defocus, then focus on the middle picture to get the black cube.

Defocus and go right.

Statue

Focus on the base of the statue.

Get the bird's eye.

Make note of the three columns:Cross, stern, wide.

Eye, bird, downturned.

Gem, calm, wide.

Make note of the numbers: 148Defocus, then focus on the top of the statue.

Switch the face to column 1, then click the mouth, to get the eye.

Switch the forehead to the eye, then put the eye there.

Switch the face to column 2, then click the mouth, to get the gem.

Switch the forehead to the gem, then put the gem there.

Switch the face to column 3, then click the mouth, to get the shell.

Defocus and go right twice.

Columns

Focus on the bottom: left quadrant.

Rotate the bottom: left's panels until all lines up to get a key.

Use the key on the locked cabinet.

Put the birds eye in the skull, then click it to get another key.

Defocus, then focus on the bottom: right.

Rotate the bottom: left's panels until all lines up to get a piece.

Put the shell in the top left cabinet to get a can of oil.

In the upper: right, enter: 148Get another piece.

Defocus, then focus on the top.

Turn the circles until you can move the slider to get a piece.

Turn the pieces to reveal a square and thus a bottle of ink.

Use the key on the locked cabinet.

Click the jar to unscrew the lid.

Put the ink in the jar, then click the jar to get a heart.

Note the green lines.

Defocus, then focus on the bottom left.

Open the upper left door and slide the sliders to match the green lines.

Place the heart in the bottom right door to get a pair of scissors.

Return to the top.

Open the door with the lines and get another piece.

Defocus, then focus on the bottom: right.

Put the pieces in the bottom: right door, then get the candle.

Defocus and go left.

Chamber

Put the black cube in the center.

Click where the black crosses are until the door is entirely crumbled away.

Use the candle on the two torches.

Note the arrows over the door:Left, Right, Left, left, Right, Right.

Select the can of oil, then click the torches to follow the arrows.

Click the man in the boat.

Click the water for the man to show up.

Focus on the man.

Use the scissors to cut the strings off his mouth.

Click his head.

Click his mouth until a crow emerges from the man's mouth.

Click on Mr. Crow.

Chapter 4/4: The Cabin

Silently, the old crow and I sailed to a small island in the middle of the lake. Without a word, the crow left me, wondering what to do.

NOTE: This chapter requires speed.

Summer, 1972

The Cabin

Cabinet

Get the three cogs from behind and within the cabinet.

Click the middle of the wall and open the panel.

Click the left of the wall to reveal the outline of an elevator door.

Go right.

Window

Get the cog over the window.

Click the panel next to the window and open it.

Turn the pipes so that they link up.

Defocus and go right.

Sink

Get the cog from behind the sink.

Open the cabinet doors and get the cog and crowbar.

Get the matches from the box.

Open the panel, top left.

Focus on the gears.

Put the cogs in as follows, from top, to right, around to bottom, leaving the upper right peg empty:Wheel, star, star, wheel, gear, star.

Defocus and go right twice.

Cabinet

Use the crowbar on the left elevator door until it is free of planks.

Click above/below the dark line.

Use the matches on the gear in the right panel.

Pull the switch.

Open the elevator door and get in.

Press the red button, then the grey one.

Finally, I reached the lake. I could not feel my body any more. The time felt different to me, like I did not only lived that moment, but also my past. All my memories captured in little cubes, floating around the lake.
Added: 1 Mar 2024 - Released: 31 Jul 2015 (Rusty Lake - RustyLake.com)
Powered by
Copyright © 2011-2026 hackahobo.info